Introduction — DeciLM-7B Packs a Punch for Its Size
GPT-4 is great, but if you want privacy, customization, and cost efficiency without sacrificing performance, open source is where you should be looking. Deci AI has released a 7 Billion parameter model that packs a big punch for its size.
Deci has created raw and instruct versions of the model. Both can be fine-tuned further, and the instruct version is already set up for short-form instruction following tasks such as question answering.
Here are some facts about DeciLM-7B (and DeciLM-7B-instruct):
- Its relatively small model size offers cost-effective deployment options on readily available hardware.
- It supports a sequence length of up to 8,000 tokens.
- The model employs variable Grouped-Query Attention for enhanced computational efficiency.
- It is licensed for commercial use under the Apache 2.0 license.
Deploying DeciLM-7B on RunPod and vLLM
With these benefits, you might want to try DeciLM within your applications. This is straightforward and can be done in just five steps.
You’ll use Runpod and vLLM to create an inference endpoint for the model, mimicking the OpenAI endpoint. From there, you can use DeciLM as a drop-in replacement for OpenAI models in popular frameworks like Langchain, Llama-Index, Haystack, and AutoGen.
Using AutoGen as an example, let’s see how it’s done.
Prerequisites
Before proceeding, please ensure you have an account for the services listed below.
Runpod:
Deploying LLMs requires the appropriate hardware, specifically GPUs. You can rent a range of GPUs by the hour from Runpod. You will need to register an account, and if you intend to follow this guide, you should have an account set up with at least 10 USD of credit.
Postman:
This is a free service that you can use to test the endpoint. You can sign up for a free account on their website.
Step 1 — Determine the Compute Resource Requirements
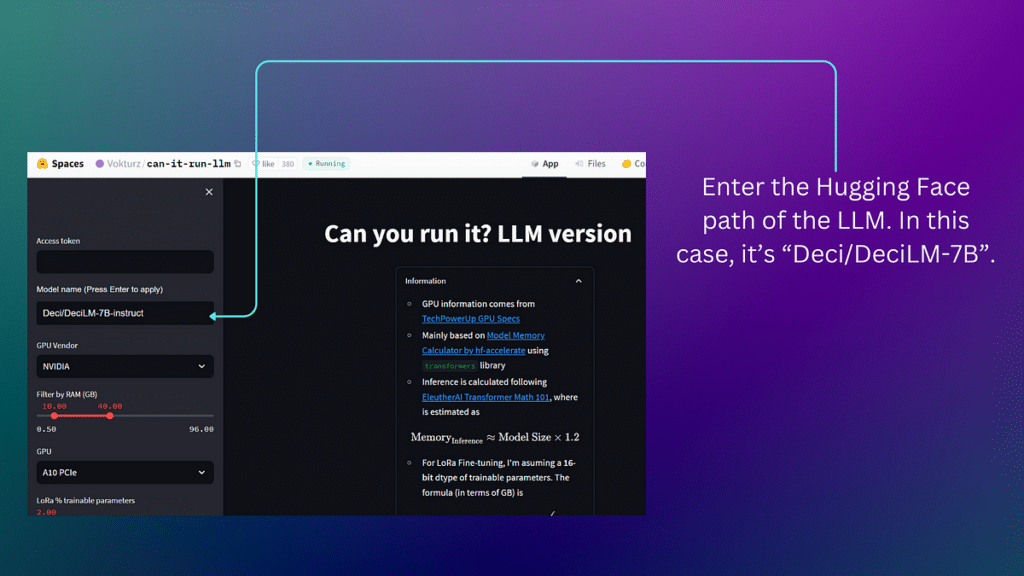
You must determine the compute resource requirements for running inference on the model. You can use the Hugging Face space “Can you run it? LLM version” as a guide.
Enter “Deci/DeciLM-7B-instruct” into the Model name input box and wait for the app to run.
Once the app has run, navigate down to the table at the bottom of the app and expand it.
Note: if you hover over the table, there is an option to expand it in another window.
The table shows the requirements in GB for storage (Total Size), inference, training, and fine-tuning with LoRA. You are most interested in the storage and inference requirements for this tutorial.
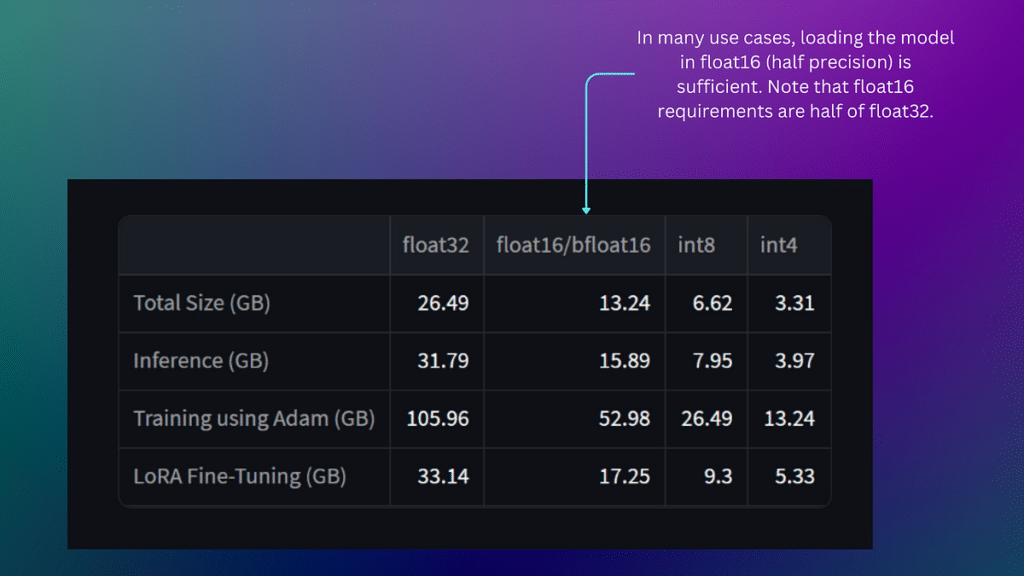
For efficiency, you can load the model in float16 (or half precision), so take note of the compute requirements corresponding to this.
Many models are originally published in 32-bit (full precision). While higher precision is often linked with enhanced accuracy or fidelity of the model’s outputs, it also increases memory requirements and greater latency. Loading the model in half-precision provides a suitable balance for many applications, offering satisfactory accuracy with reduced resource consumption and cost.
Step 2 — Create the Deployment Templates
Runpod facilitates creating a Docker container for operating the vLLM inference server. Remember, this is the tool for running inference tasks with DeciLM.
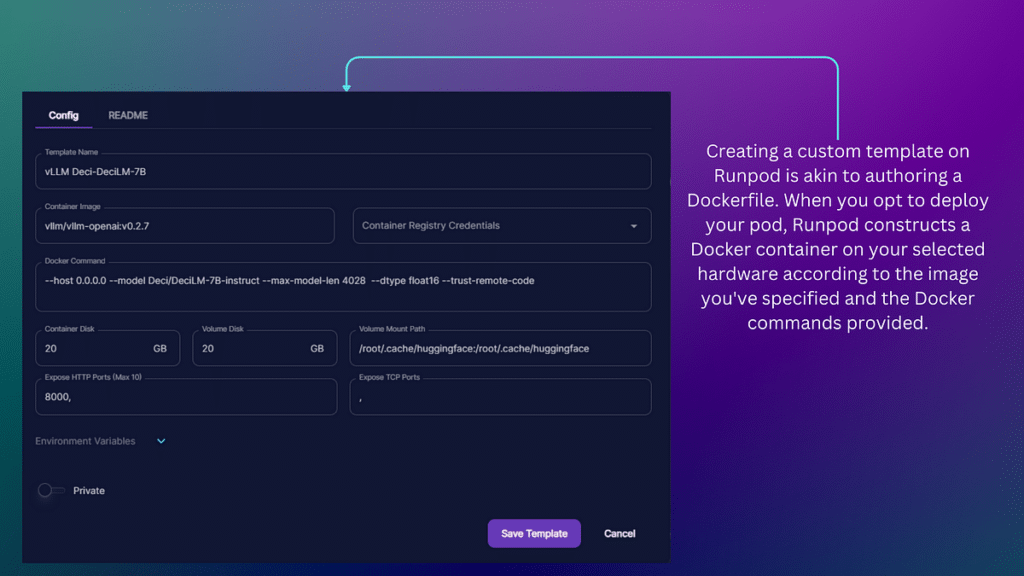
You can deploy the LLM for inference using Runpod’s deployment templates. Create a custom template using the official docker image for vLLM as a base to build the container.
Template Arguments
- Template Name: ensure you provide a memorable template name, which you can navigate back to later.
- Container Image: Set this to “vllm/vllm-openai:v0.2.7”.
- Container Disk: Set the storage location for the model and other dependencies to 20 GB. This capacity is more than sufficient, considering the model’s storage requirement of 13.3 GB.
- Volume mount: This is where the model is stored when the container (or pod) is stopped. Doing this means you won’t need to download the model from Hugging Face repeatedly. Set this also to 20 GB.
- Volume Mount Path: Directory of the cache, set this to “/root/.cache/huggingface:/root/.cache/huggingface”
- Expose HTTP Ports: You need to expose port 8000.
Docker Commands
You need to set the docker commands within the template. For this guide, you’ll set five commands.
- Host: Set this to 0.0.0.0 to make the server accessible from any machine.
- Model: Set this to Deci/DeciLM-7B-instruct to use the instruct version of the model.
- Max Model Length: Set this to 4028. Note that larger values will consume more storage resources.
- Dtype: Load in half-precision for efficiency, so set this to float16.
- Trust Remote Code: Including this option allows us to run the DeciLM model.
Putting all of that together, the Docker Command is as follows: –host 0.0.0.0 –model Deci/DeciLM-7B-instruct –max-model-len 4026 –type float16 –trust-remote-code
If there are any other parameters you wish to adjust, a full list for the inference server is outlined in vLLM’s documentation.
The template is available as described for you to deploy if you so wish.
Step 3 — Select the Hardware & Deploy Container
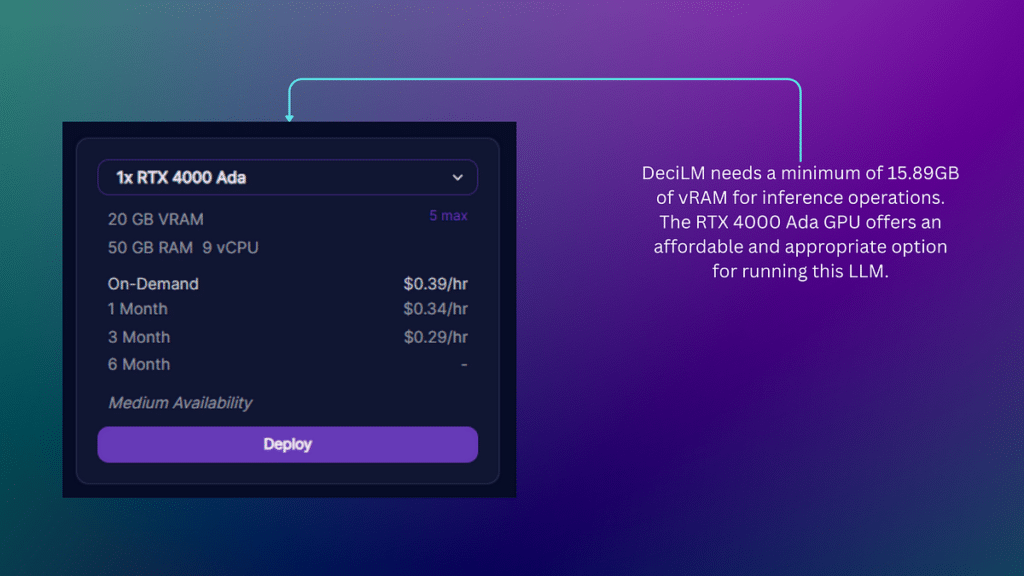
Next, navigate to the secure cloud page on Runpod. Here, you’re presented with a range of GPUs to rent.
You need around 15.89 GB for inference. Given this, you must select a GPU with enough VRAM to meet this requirement. The cheapest option is the RTX 4000 Ada, which provides 20GB of VRAM.
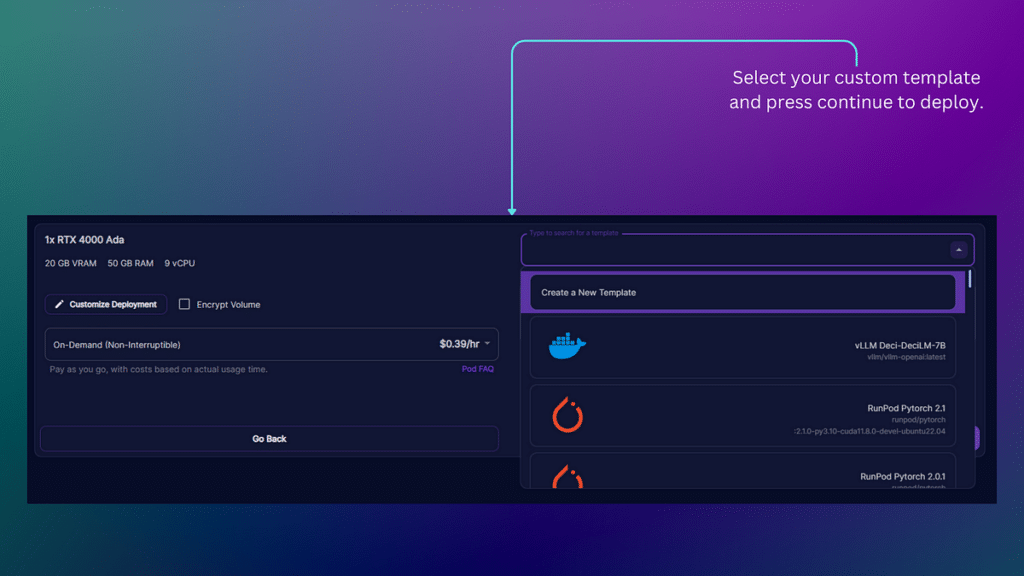
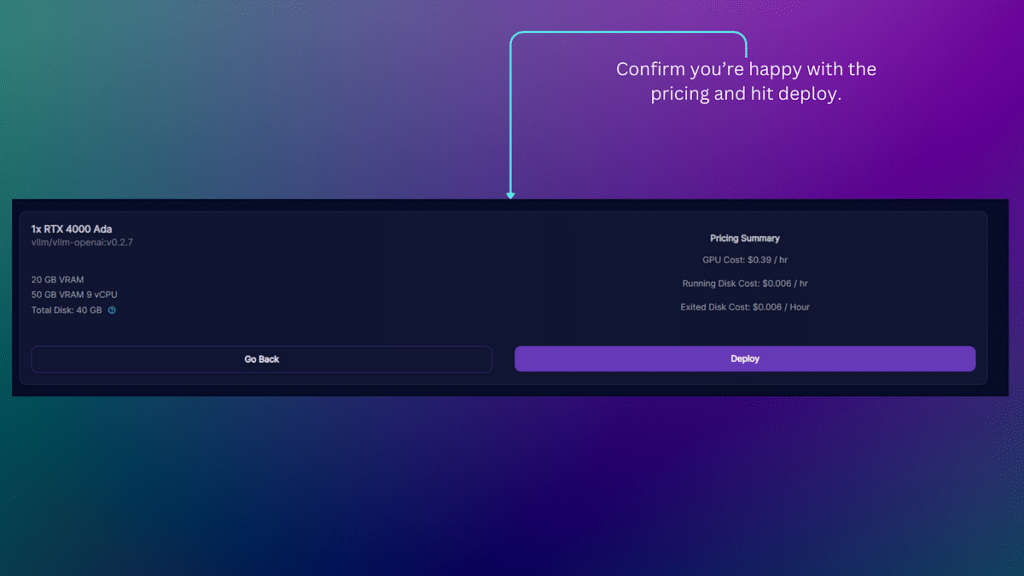
Once you choose the ‘Deploy’ option, a menu will appear, allowing you to select from your custom templates. At this point, you should choose the template you crafted in the previous step, then click ‘Continue’ to initiate the construction of your container.
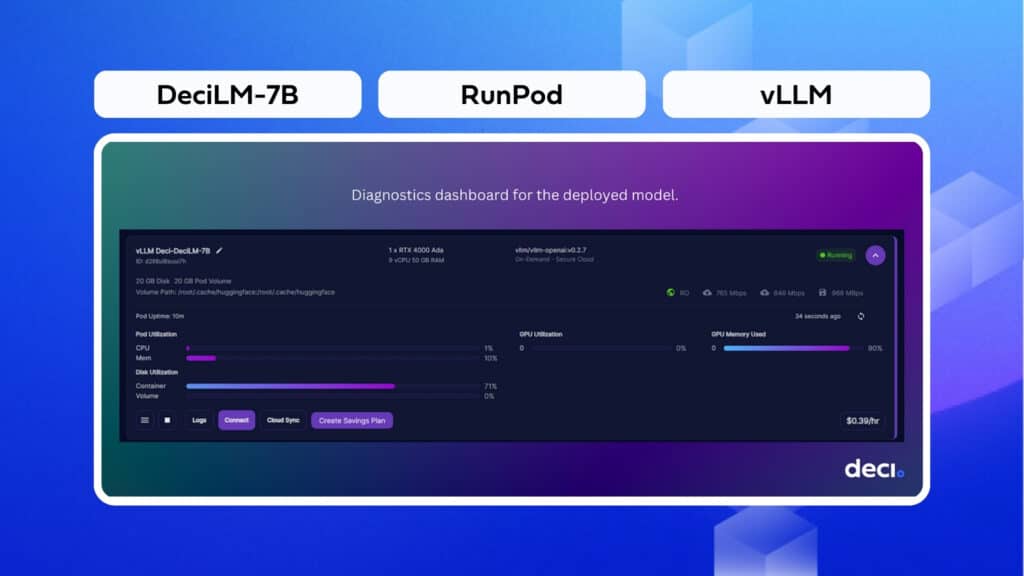
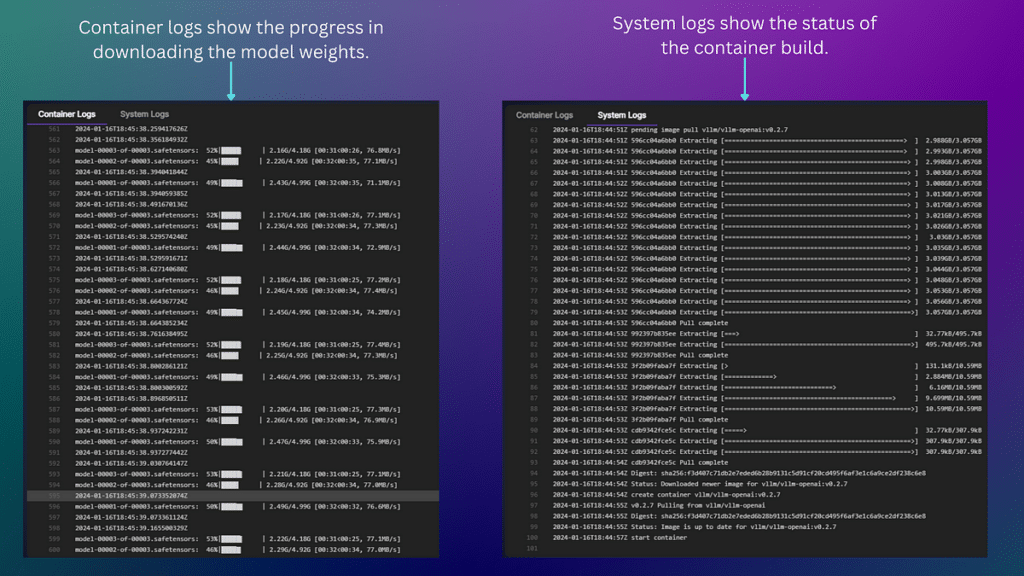
As the process unfolds, you will see both system and container logs that display the progress of your container deployment. It is essential to monitor these logs attentively, periodically checking for errors.
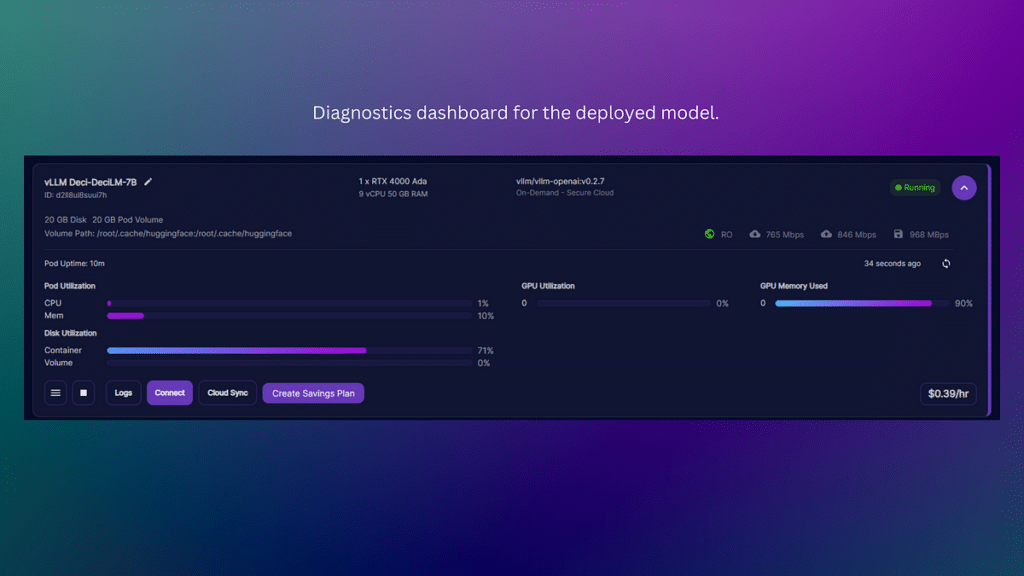
After some time, you will be presented with a diagnostics dashboard.
Select Connect on the diagnostics dashboard. If your model has been deployed correctly, you should be allowed to “Connect to HTTP Service [Port 8000]”. Clicking this option will open up a web browser with the message “{“detail”: “Not Found”}.
Please keep this browser open or note down the URL for future reference, as it serves as the endpoint for the model.
Step 4 — Test Endpoint with Postman
In a separate window, navigate to Postman. Once there, create a new workspace or select “My Workspace” (which should already be there by default).
When the workspace opens, click “new” on the left-hand side panel and select “HTTP”. You’ll be presented with a workbench to test the model endpoint.
In the send box, change the request type to “POST”. Paste your URL endpoint into the box and tack “/v1/completions” on the end to mimic the OpenAI API endpoint.
Navigate to the “Body” tab and construct the dictionary as shown in the diagram below:
- “model”: “ Deci/DeciLM-7B-instruct”,
- “prompt”: “Who are you?”,
- “max_tokens”: 1000,
- “temperature”: 0

You can adjust the max_tokens and the temperature based on your requirements. Remember that max tokens cannot exceed your initial set when constructing your template.
You should get a response to the prompt if all is working well. If you navigate back to the container logs on Runpod, you can see the POST request sent to the server you are renting.
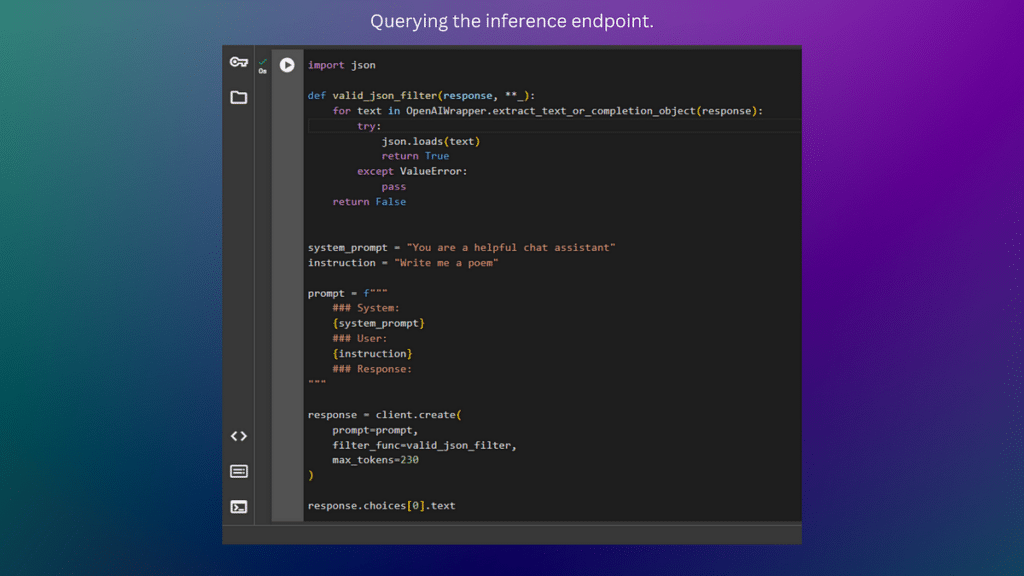
Step 5 — Using the Endpoint in AutoGen
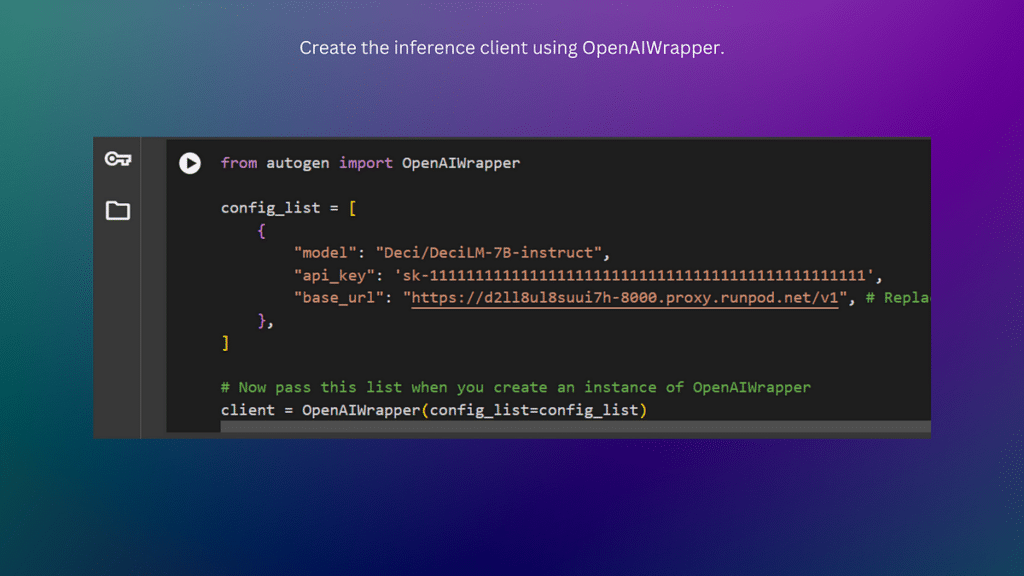
Once you have tested the endpoint, you can use it within AutoGen. The endpoint mimics the OpenAI API, so drop the URL into the OpenAI wrapper provided by AutoGen.
First install AutoGen. The version used in this demonstration is 0.2.6. Simply run the command “pip install py-autogen==0.2.6”.
Next, you should configure the inference client. This is done by creating a JSON object with model, api_key, and base_url as keys. The model should point to the model set up within your container. For this demo, it’s “Deci/DeciLM-7B-instruct”.
The API should be a placeholder key (you may wish to use: “sk-111111111111111111111111111111111111111111111111”). Lastly, the base_url should be the URL endpoint. Ensure you tack “/v1” at the end of the URL.
Finally, you can query the model through the inference endpoint. The most important thing to consider here is that your prompt should follow the prompt format outlined for DecLM-7B-Instruct. If your prompt doesn’t follow this format, you may get unexpected results when querying the model.
Here’s a link to the Google Colab with the AutoGen deployment.
Working with Other Frameworks & Resources
The vLLM inference endpoints integrate well with Llama Index, Langchain, and Haystack. You can use your endpoint URL as a drop-in and build chat-bots, RAG pipelines, and agents with DeciLM and many other open-source models. Give it a try.
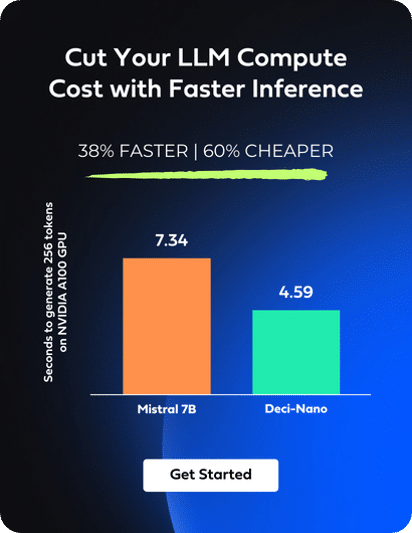
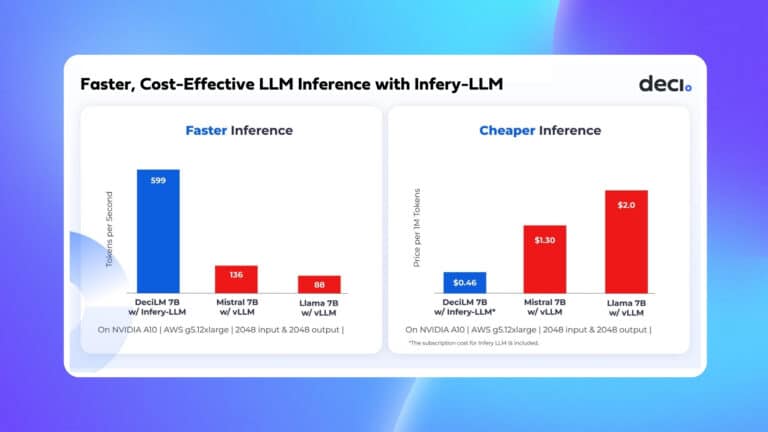
Faster Inference with Deci’s GenAI Development Platform
In addition to DeciLM-7B, Deci offers a suite of fine-tunable, high performance LLMs, available through our GenAI Development Platform.
If you’re interested in exploring our LLMs firsthand, we encourage you to sign up for a free trial of our API.
For those curious about our VPC and on-premises deployment options, we encourage you to book a 1:1 session with our experts.