Defining Image Brightness Distribution
Image Brightness Distribution refers to the distribution of brightness values across all images in a dataset.
Brightness is typically measured on a scale from 0 (complete darkness) to 255 (maximum brightness).
The Importance of Image Brightness Distribution
Immersed in the intricacies of computer vision tasks, it’s surprisingly easy to overlook a seemingly rudimentary factor – brightness. Yet, neglecting this simple parameter can cast a shadow on your model’s performance.
Imagine your training set only contains images captured in broad daylight, while your validation set consists of images taken in low-light conditions. A potential outcome? A model that can’t adjust its “eyesight” when the lights get dim.
Understanding your dataset’s image brightness distribution can help identify such potential issues early, ensuring the model is trained on a diverse and representative dataset.
Calculating Image Brightness Distribution
To calculate your dataset’s image brightness distribution, you iterate over all the images in your dataset.
For each image, convert it to the LAB color space and calculate the mean brightness level.
The LAB color space is used because it separates the lightness (L) component from the color components (A and B), making it easier to measure brightness without the influence of color.
All of the brightness values are then combined to make up a distribution, which can be visualized as a histogram, or, as we did above, using a Kernel Density Estimation (KDE) plot.
Do this separately for the training and validation sets.
Here’s how Image Brightness Distribution is calculated in DataGradients.
Exploring Image Brightness Distribution Through Examples
Let’s further explore this feature by turning our attention to two examples.
Example 1: A Favorable Case
Consider the following Image Brightness Distribution plot:
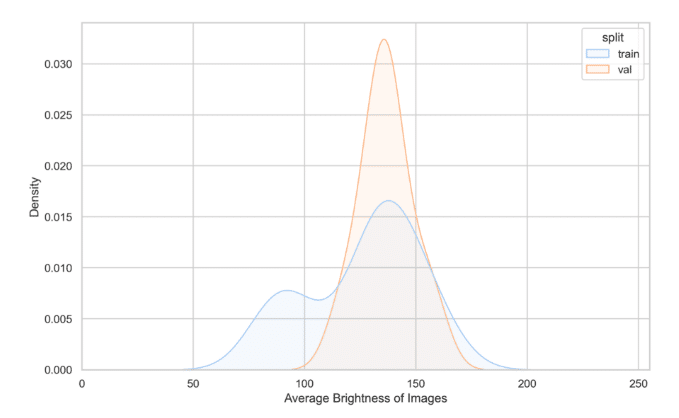
It tells us two things about our training and validation sets:
- The training set’s brightness distribution is most concentrated in the same area as the validation set’s.
- The training set’s brightness distribution is wider than that of the validation set.
The first observation reassures us that the training data contains many data samples that are representative of the validation set. This is good because we want to validate the model on data that is sufficiently similar in terms of image brightness to the data that it was trained on.
Conversely, the second point implies that a model trained on this training set will be exposed to varying brightness levels. Consequently, it is likely more resilient to changes in brightness distribution, something that could potentially occur when transitioning the model into a production environment.
Example 2: A Problematic Case
Now, consider another example, which does expose a potential problem.
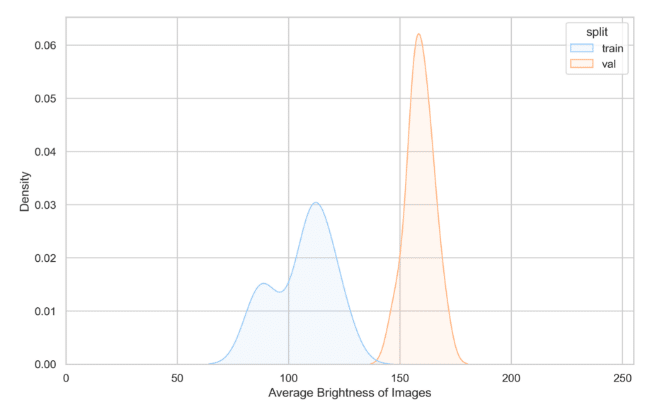
In this instance, we observe that the distributions of image brightness for the training and validation sets do not coincide. The training set primarily includes images of lower brightness ranging from 75 to 145. In contrast, the validation set solely comprises higher-brightness images, ranging from 145 to 175.
This discrepancy can pose challenges, as a model trained on this data is prone to overfitting towards images with lower brightness and might exhibit suboptimal performance in higher brightness conditions.
What to do?
To delve deeper into why such a stark difference exists between the training and validation sets, visualizing samples from your dataset could provide valuable insights.
This variation could be due to:
- A potential glitch in your image processing pipeline, which you could rectify by going over the transformations you apply to your images and ensuring that none of them is defined in a way that would explain this shift in image brightness (i.e. increase the average brightness for the validation set or decrease it for the training set).
- A considerable disparity between your images – for example, the training set may contain images exclusively from indoor settings, while the validation set is composed solely of outdoor images taken on the street.
To address the second issue, you may want to shuffle and redistribute your images between the training and validation sets (we delve into this technique in lesson 1.4). An alternative option is to introduce a transformation to your training data to randomly change your training image brightness, so that the post-transformation training set brightness distribution would overlap the validation set.